
Anterior Case Design

Proportion, midline, smile line, and emergence designed in CAD — so dentists can put a mockup in front of the patient and get it approved before a single tooth is prepped.

An anterior case is decided at the design stage, not the ceramic one. Tooth proportion, the incisal edge, the midline, and the smile line are resolved together — so the prep serves a plan instead of the plan chasing the prep.

Jahn De Khudikine, Founder · Universal Dental Lab
Jahn De Khudikine Founder · Universal Dental Lab

Why send it here

Approve the smile line on paper before enamel comes off. We design to that line.

A practice's schedule lives or dies by the lab — I've watched one late case push back a whole day of chair time.

So I still know the cases moving through this lab, and I answer for how each one is made. Send a case here and it doesn't drop into a queue — it lands with me and one technician who carries it start to finish.

Start a case
Before the prep
Approved in a mockup while it is still reversible Length, midline, and edge signed off first
One segment
Proportion and symmetry designed across the units, not tooth by tooth Referenced to the lip line and the face
Your technician
One planner holds your case Reach them directly — no call-center queue
Free scanner
3Shape TRIOS 6 for partners Go fully digital at no cost

Workflow

From Records to an Approved Design

Four steps from your scan to a design the patient has already said yes to — before you pick up a bur.

  1. Records & Goals

    We review the scan, bite, photos, and your esthetic goals — desired length, midline, and how the teeth should relate to the lip and face.

  2. Digital Design & Wax-Up

    Tooth proportion, smile line, midline, and emergence are designed in CAD, and a digital wax-up gives the case a testable blueprint.

  3. Mockup & Approval

    The design converts to a mockup or provisional so you and the patient confirm esthetics and function before prep. Revisions here cost nothing.

  4. Design to Final

    On approval, the approved contours carry through to the definitive veneers or crowns, so the final matches the plan that was signed off.

Input
STL + full photo series
Reference
Lip line and the face
Deliverable
Wax-up and mockup
Turnaround
Quoted per case at intake
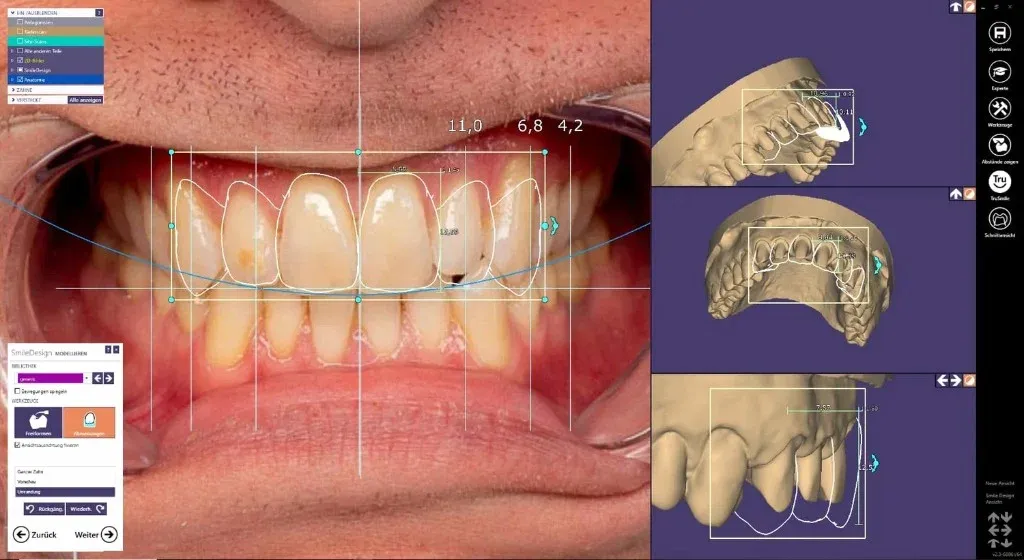
Anterior segment being designed in CAD against a full-face smile photo overlay

Overview

Anterior Case Design, Settled Before the Prep

An anterior case is decided at the design stage, not the ceramic one. Anterior case design is where tooth proportion, the incisal edge, the midline, and the smile line are resolved together — so the prep serves a plan instead of the plan chasing the prep.

Design an anterior tooth by tooth and it drifts — one central a touch wider, an edge a millimeter long, a midline that reads off against the face. The eye is unforgiving here. So we design the segment as a whole, referenced to the lip line and the patient's features, and give the case a blueprint before anything irreversible happens.

  • Designed as one segment: Proportion and symmetry stay consistent across the units instead of drifting tooth to tooth.

  • Referenced to the face: Midline, edge position, and smile line are checked against the lip line and features, not the teeth alone.
Learn more
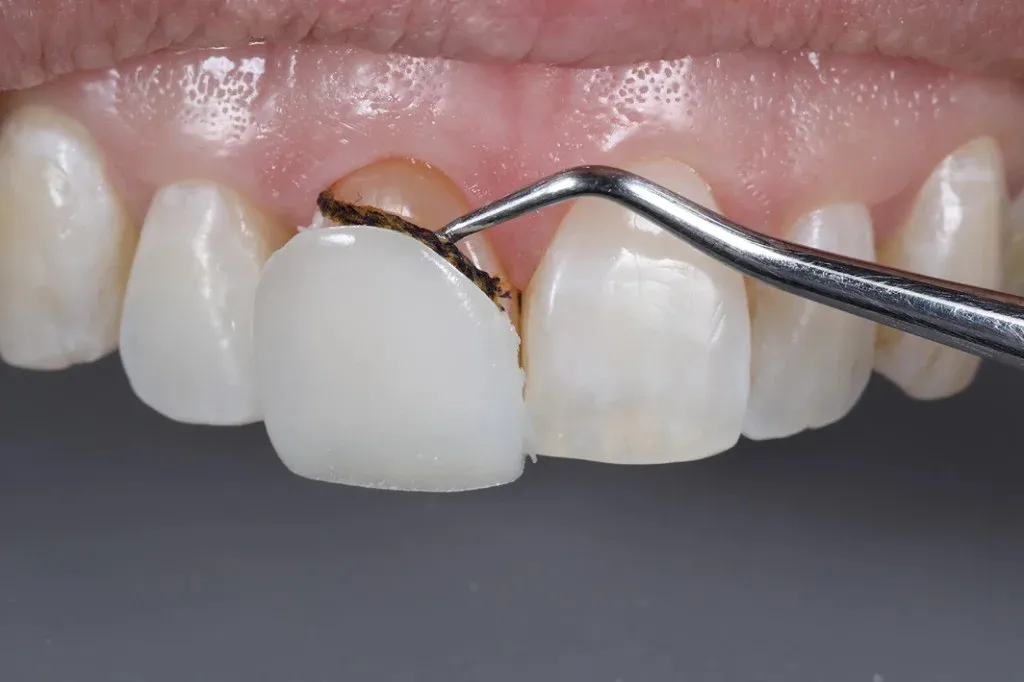
Try-in mockup seated over unprepped anterior teeth, patient reviewing in a mirror

Blueprint First

A Wax-Up the Patient Can Approve

The digital wax-up is the anterior case's contract. Converted to a mockup or provisional, it lets the practice test length, proportion, and speech before prep — and lets the patient say yes to the real result, not a promise.

That blueprint is a digital wax-up that converts to a mockup. Esthetics and phonetics get tested in the mouth while they are still reversible, the patient signs off on what they will actually get, and the definitive veneers or crowns carry the contours that were already approved.

  • Tested while reversible: Length, proportion, and speech are confirmed in the mouth before any tooth is prepped.

  • Signed off, then built: The definitive veneers or crowns carry the contours the patient already approved.

Learn more
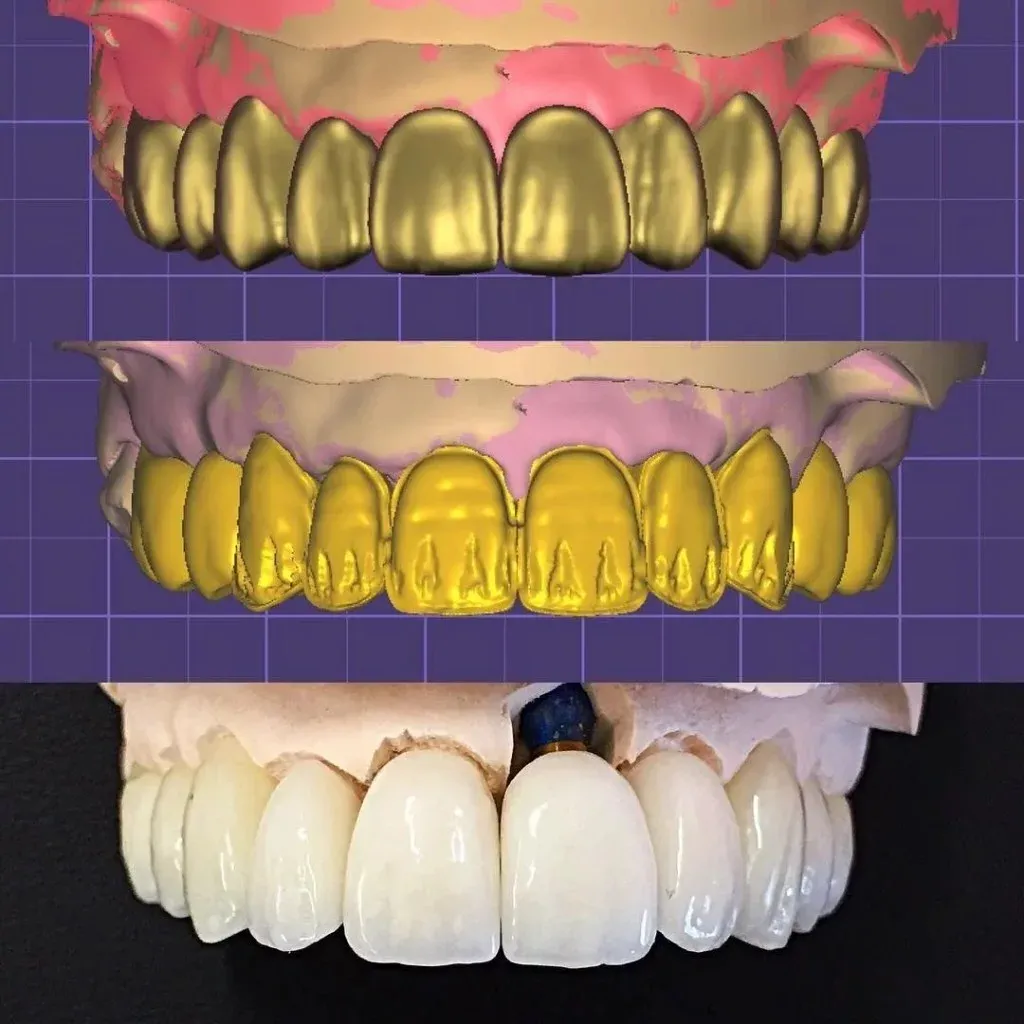
Incisal edge cross-section in the design software showing thickness against the opposing arch

Design to Material

Designed for the Ceramic and the Function

The design accounts for what the final material can do. Minimal-prep veneers, layered porcelain, and lithium disilicate each carry contour and translucency differently, and where the case has functional load — anterior guidance, a deep bite, parafunction — the incisal edge and thickness are designed for it, not just for looks.

Our technicians flag where an esthetic goal and the mechanics disagree, so the trade-off is your call before the case moves forward rather than a surprise at seat.

  • Contour to the material: Veneers, layered porcelain, and lithium disilicate carry thickness and translucency differently — the design respects that.

  • Function built in: Anterior guidance, deep bite, and parafunction shape the incisal edge and thickness, not just the looks.

Learn more

Applications

What Anterior Case Design Covers

From a two-unit proportion fix to a full anterior redesign — planned as one coherent segment.

Multi-Unit Anterior Cases

Four to ten units where tooth proportion, midline, and the incisal plane have to be designed together, not tooth by tooth.

Diastema & Proportion Correction

Closing spaces or reproportioning worn teeth without leaving the result too wide, too long, or out of balance with the arch.

Worn & Collapsed Dentition

Restoring incisal edge position and length on eroded or attrition cases, referenced to the lip line and function.

Implant-Adjacent Esthetics

Designing emergence and contour where an anterior implant crown sits beside natural teeth in the smile line.

Combined Veneer/Crown Segments

Mixed cases where veneers and crowns share an anterior segment and must read as one continuous design.

Pre-Restorative Blueprints

A design and wax-up the practice can convert to a mockup or provisional to test esthetics and function before prep.

Method Selection

When to Design the Anterior First

  • Multi-unit anterior cases where proportion must be designed together
  • Diastema closure and reproportioning of worn or short teeth
  • Restoring incisal edge position on worn or collapsed dentition
  • Anterior implant crowns that sit beside natural teeth in the smile line
  • Combined veneer and crown segments that must read as one
  • Pre-restorative blueprints to test esthetics and function before prep

When esthetics and function pull in different directions, we lay out the trade-off before finalizing — the call is yours, made on a design you can see rather than one described.

Advantages

Why Design the Case First

  • Design Before You Prep

    Settling proportion, midline, and incisal edge in CAD means the prep is driven by the planned result — not the result improvised around the prep.

  • The Patient Sees It First

    A wax-up converts to a mockup, so esthetics and phonetics are tested and approved before anything irreversible happens.

  • Function Built In

    Anterior guidance, envelope of function, and the incisal plane are designed with the esthetics, not reconciled after the fact.

  • One Coherent Segment

    Designing the anterior as a whole keeps proportion and symmetry consistent across the units instead of drifting tooth to tooth.

Where the design earns its place

Design an anterior tooth by tooth and it drifts — one central a touch wider, an edge a millimeter long, a midline that reads off against the face. Designing the segment as a whole, against the lip line and the patient's features, is what keeps proportion, symmetry, and the smile line coherent from blueprint to final.

Materials & Quality

Design, Materials, and Quality Control

Designing to Material and Function

The design accounts for what the final material can do. Minimal-prep veneers, layered porcelain, and lithium disilicate each carry contour and translucency differently, and where the case has functional load — anterior guidance, a deep bite, parafunction — the incisal edge and thickness are designed for it, not just for looks. Our technicians flag where an esthetic goal and the mechanics disagree.

Read the full quality process Show less

Digital Design and Review

Proportion, midline, emergence, and contacts are designed and reviewed in CAD before the case moves forward. The wax-up and mockup are the review — if the design and your notes conflict, we resolve it with you rather than guessing at the patient's intent.

From Approved Design to Final

Because the approved wax-up drives the definitive restorations, the final segment reflects the plan that was signed off. A staged case stays consistent unit to unit, and a later addition references the same design instead of starting over.

Case Submission

Sending an Anterior Case Design

We accept scans from iTero, 3Shape, and Medit — but the facial photos are what let us design to the smile, so send the full series.

To keep your case moving, include:

  • An STL scan or impression of both arches and a bite registration
  • A photo series: retracted, natural smile, and profile
  • Esthetic goals — desired length, midline, and any proportion change
  • A preferred incisal edge position or reference, if the patient has one
  • Notes on function: guidance, bruxism, or a deep bite

The usual gaps are a missing smile photo and undefined edge position — both stall the design. New to the lab? Open an account and we will plan your first anterior case.

Why Universal Dental Lab

Why Practices Design Anterior Cases With Us

  • Proportion Before Porcelain

    Tooth width, incisal edge position, and gingival levels are agreed in the design pass — not corrected after ceramic is already layered.

  • Wax-Up and Mockup on the Record

    Approvable wax-up and mockup stages give the case a shared reference so the definitive restorations match what was previewed.

  • Two Units or Full Smile

    A small anterior correction and a full smile redesign use the same design discipline so later units do not drift from the first approval.

Start a case

Send one case. Keep the scanner.

Open a partner account and your first case moves with a shade record and our remake guarantee — if a unit does not seat, we redo it at no charge.

  • Free 3Shape TRIOS 6 scanner for active partners
  • Under-2% remake rate — remakes at no charge
  • One named technician you reach directly — no call center

Prefer to talk? +1 747-268-0808

No call center — you hear back from the lab, not a bot.

Anterior Design FAQ

Anterior Case Design — Questions Dentists Ask

Before prep on any case where proportion, midline, or length is negotiable. The service is built around designing in CAD, approving a wax-up, and optionally mocking up while enamel is still untouched. Sending only post-prep scans limits how much we can fix without remaking restorations.

Articulated arches, proposed tooth shapes in occlusion, midline and incisal-edge position relative to your photos, and exportable files for wax-up print or mockup. You get something you can sign off on clinically — not just marketing render — before the patient commits.

How to send a file

Locked enough that prep guidance makes sense. Minor tweaks can still happen in the mockup, but wholesale midline shifts after prep are expensive. Use the design proof to settle length and edge position with the patient; the mockup confirms speech and lip dynamics.

Smile preview mockups

They overlap but start from different emphases. DSD leads with facial analysis and smile-line photography; anterior case design is the broader CAD planning workflow — proportion, guidance, wax-up, and mockup — whether or not you use full DSD branding. Many cases use both; pick DSD when facial reference is the main gap.

Digital Smile Design (DSD)

A single central still needs neighbor context so width and value match; we scope to the aesthetic zone you are treating, not always ten units. Tell us how many teeth the patient sees in conversation and whether later phases will extend the rehab — that keeps the design from boxing in future work.

Partner Offer

A Free Intraoral Scanner for Partner Practices

Partner with Universal Dental Lab and we place a 3Shape TRIOS 6 Wireless in your operatory — free for the length of our partnership. Scan the prep, send it in seconds, and skip impressions entirely.